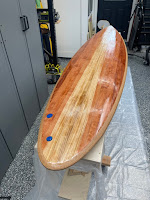
My wife and I built a wooden surfboard in our garage and it was surprisingly easy! We teamed up Jarvis Boards and TotalBoat and to make a custom 7'2" thruster out of redwood. I'm beyond stoked on how it turned out. It was so much fun working with Lindsay on this project that we already made plans to do a few more!
If you want to get a Kit from Jarvis Boards use code NoBadTides for 10% off your order.
Check out this video below to see the how it all came together... And I also added pictures at the bottom of the progress we made along the way.
Making a Wooden Surfboard: The Surfer's Dream Come True
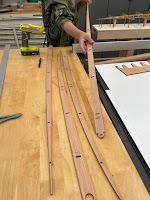
Hi there friends, in today’s video I’m going to show you how we made a hallow surfboard entirely made out of redwood. We partnered up with Jarvis Boards to create our surfboard from one of their new surfboard kits. This 7'2"was inspired by the legendary shaper Gerry Lopez's Pocket Rocket and designed by both Eric from Jarvis and Eric of NoBadTides. We started with building the frame of the kit using hot glue, that way if we had any changes to make, it was as easy as using a heat gun to warm it up and readjust the frame. Once the frame was built, I ripped down quarter inch strips on my tablesaw from a 2” x 6”x8’ redwood board to get our strips for the surfboard.
We glued each strip down using polyurethane glue and held it in place with clamps. Each strip took about an hour to fully dry before we could unclamp it and start a new strip, which was the most time-consuming process of the entire build. Once we had all of the strips glued down I use my oscillating tool to cut the board to shape, and then a flush trim router bit with a router to clean up the board. Then we cut two strips of 3/8 inch thick cork for the rails and wrapped it around the board twice using heavy duty spray adhesive. Then I trimmed down the cork rails, using my oscillating tools, and had Eric shape the rails using a Shinto saw rasp.
Once the board was shaped and sanded down, we gave a thin coat of penetrating epoxy from Total Boat to the wood to help soak in to the grain before giving our fiberglass coat. We fiberglass the top of the board first and used a cut lap with tape on the underside making it easy for clean up once the fiberglass was 75 to 80% cured we used a sharp razor blade to cut away the excess on the bottom of the board, a light standing on the edge and then we rinse and repeat the same process with the fiberglass. Once everything was fully cured we gave a hot coat of epoxy over the top to bring out all the colors, and it really made the board shine.
We let it fully cure for a few more days and then sanded down to 320 one more time before giving it a nice coat of Halcyon varnish once the board was fully cured it was time to take her out in the water for a first maiden voyage. This was such a fun project and I can’t wait to make another board!!! This is a simple and easy project, and I highly recommend building one, be sure to tag me when you do make one of your own. Thank you so much for watching today's video. If you enjoyed this video be sure to like and subscribe to my channel. Here’s link to the surfboard kit: https://jarvisboards.com/collections/... Use Code: WOODBRAIN for a 10% discount. Thanks in advance Friends Be sure to follow me on Instagram & TikTok @Wood_Brain Business Inquires contact: lindsayz@influint.co Support me on Patreon: https://www.patreon.com/Wood_Brain?fa... Thank you to Jarvis Boards for being there every step of the way during the building process and being so extremely helpful as well as creating such fun surfboard kits, can't wait to build another one. Thank you to Total Boat for always being a huge supporter of my channel and for always creating rad products to create fun projects like this. Use Code: WOODBRAIN for a 10% discount. Thank you to my awesome husband @nobadtides on Instagram for all ways being an amazing supporter of what I do. More info… Camera Used: Canon GX7 markii https://amzn.to/48yIxFE Tripod: https://amzn.to/36z807A Wheels for tripod https://amzn.to/3uZt8Nx


No comments:
Post a Comment
Note: Only a member of this blog may post a comment.