Showing posts with label Jarvis Boards. Show all posts

Friday, January 5, 2024

Making a Wooden Surfboard: The Surfer's Dream Come True


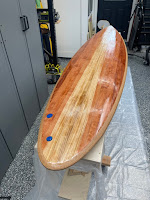
My wife and I built a wooden surfboard in our garage and it was surprisingly easy! We teamed up Jarvis Boards and TotalBoat and to make a custom 7'2" thruster out of redwood. I'm beyond stoked on how it turned out. It was so much fun working with Lindsay on this project that we already made plans to do a few more!

If you want to get a Kit from Jarvis Boards use code NoBadTides for 10% off your order.

Check out this video below to see the how it all came together... And I also added pictures at the bottom of the progress we made along the way. 

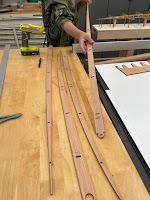
Hi there friends, in today’s video I’m going to show you how we made a hallow surfboard entirely made out of redwood. We partnered up with Jarvis Boards to create our surfboard from one of their new surfboard kits. This 7'2"was inspired by the legendary shaper Gerry Lopez's Pocket Rocket and designed by both Eric from Jarvis and Eric of NoBadTides. We started with building the frame of the kit using hot glue, that way if we had any changes to make, it was as easy as using a heat gun to warm it up and readjust the frame. Once the frame was built, I ripped down quarter inch strips on my tablesaw from a 2” x 6”x8’ redwood board to get our strips for the surfboard.

We glued each strip down using polyurethane glue and held it in place with clamps. Each strip took about an hour to fully dry before we could unclamp it and start a new strip, which was the most time-consuming process of the entire build. Once we had all of the strips glued down I use my oscillating tool to cut the board to shape, and then a flush trim router bit with a router to clean up the board. Then we cut two strips of 3/8 inch thick cork for the rails and wrapped it around the board twice using heavy duty spray adhesive. Then I trimmed down the cork rails, using my oscillating tools, and had Eric shape the rails using a Shinto saw rasp.

Once the board was shaped and sanded down, we gave a thin coat of penetrating epoxy from Total Boat to the wood to help soak in to the grain before giving our fiberglass coat. We fiberglass the top of the board first and used a cut lap with tape on the underside making it easy for clean up once the fiberglass was 75 to 80% cured we used a sharp razor blade to cut away the excess on the bottom of the board, a light standing on the edge and then we rinse and repeat the same process with the fiberglass. Once everything was fully cured we gave a hot coat of epoxy over the top to bring out all the colors, and it really made the board shine.

We let it fully cure for a few more days and then sanded down to 320 one more time before giving it a nice coat of Halcyon varnish once the board was fully cured it was time to take her out in the water for a first maiden voyage. This was such a fun project and I can’t wait to make another board!!! This is a simple and easy project, and I highly recommend building one, be sure to tag me when you do make one of your own. Thank you so much for watching today's video. If you enjoyed this video be sure to like and subscribe to my channel. Here’s link to the surfboard kit: https://jarvisboards.com/collections/... Use Code: WOODBRAIN for a 10% discount. Thanks in advance Friends Be sure to follow me on Instagram & TikTok @Wood_Brain Business Inquires contact: lindsayz@influint.co Support me on Patreon: https://www.patreon.com/Wood_Brain?fa... Thank you to Jarvis Boards for being there every step of the way during the building process and being so extremely helpful as well as creating such fun surfboard kits, can't wait to build another one. Thank you to Total Boat for always being a huge supporter of my channel and for always creating rad products to create fun projects like this. Use Code: WOODBRAIN for a 10% discount. Thank you to my awesome husband @nobadtides on Instagram for all ways being an amazing supporter of what I do. More info… Camera Used: Canon GX7 markii https://amzn.to/48yIxFE Tripod: https://amzn.to/36z807A Wheels for tripod https://amzn.to/3uZt8Nx




Tuesday, November 28, 2023

Things to Consider When Making a Surfboard


Do you ever wonder what it would be like to make your own surfboard? I was recently asked that question and now I kind of want to make a hallow wood surfboard... I mean I've had lots of custom surfboards made for me. I've even designed a few for a friends, but I have yet to make my own from start to finish... 

Here are some things to get you inspired about making a surfboard out of a few different materials. The concepts are all pretty much the same... Have an idea of the basic shape and dimensions, materials, rails, fin set and that sort of stuff. Then make the thing and surf it.

Check these out: 


This weeks episode of Surfing Explained we break down the construction of a typical foam and fiberglass surfboard. Starting with the stringer, we then analysis the differences between expanded polystyrene (EPS) and Polyurethane (PU) foam, then look at the fiberglass weights and polyester resin vs epoxy resin.


⭐️ OUR MOST POPULAR SURFBOARD TUTORIALS ⭐️ DECKS ----------    • SURFERS DON'T UNDERSTAND how this aff...   EPS vs POLY -    • Surfboard Construction Makes A MASSIV...   TAILS ------------    • SURFBOARD DESIGN FOR BEGINNERS - UNDE...   FINS --------------    • SURFBOARD FINS FOR BEGINNERS - SURFBO...   CONCAVE -----    • HOW TO GO FAST ON A SURFBOARD - SURFB...  

🚨 FOLLOW 🚨 🌊 SURF ACTION -   / tandcsurf   🏄🏼‍♂️ SURFBOARDS -   / tcsurfboards   👕 MERCHANDISE -   / tcsurfshop  


REcycle for TOmorrow // RETO. Dating back to December, 2011, Björn Holm has been hard at work collecting broken skateboards from friends, relatives, and fellow skaters in his community. His mission: a daunting DIY project of building a 6'4" fish made exclusively from old skateboards. This is not something you'd expect from a former professional motocross rider from Finland. But with studies in furniture design and an interest in board building, he utilized these skills to piece together a 20 pound, hollow surfboard out of material (skateboards) that essentially have no straight lines. The result: a colorful, 100% recycled surfboard. Enjoy Björn's story... NOTE: After this video was created Bjorn has tested the board, and he reports that its working great! "The board is stable, easy to paddle and catch waves with. And it is such an amazing thing to ride something that you have made yourself. There really is something special about it, all the hardwork put down finally pays off." Check out more photos from this project at http://www.korduroy.tv/blog/2012/more... Board Builder: Björn Holm http://boboholm.com/ Camera/Edit: Patricia Wiklund http://www.korduroy.tv/shows/specials...


When I was making the video, I was still very new to the surfboard industry (Just a stoked surfer). So, Hopefully, the video doesn't mislead people. (To do it in the living room or something) I guess the way I did it is only for reference, so good luck if you are trying to make one! If you are making one, please check out the tips!!! (Below) 1. Better to work in a workshop rather than a living room (especially the process of pouring resin and sanding). 2.At least open the window when pouring the resin. 3. For sanding: maybe some people can get away with sanding. (But If you really need to sand in the living room, the way I did it is to cover the whole surfboard with a giant plastic bag, actually I tape two of them together, and then just stick my hand inside to sand it, so all the dust stay inside the plastic bag and stay away from the living room! Hope this might help in some way?)


"¡Bienvenido al episodio 2 de la serie de construcción de tablas de surf de madera! En este video, doy forma y personalizo una tabla de surf hueca de madera. Observe de cerca el proceso de modelado y descubra cómo el arte se combina con la funcionalidad. Desde detalles precisos hasta pinceladas creativas, exploro técnicas perfeccionadas por mi al largo de los años para transformar la madera en una tabla de surf ligera, funcional y único. Explora la fusión perfecta de artesanía y rendimiento en las olas. ¡Suscríbete al canal para obtener más contenido y no te pierdas los próximos episodios! Sígueme en instagram: @kalungasurfboards


Start to finish time-lapse of shaping and glassing a high-performance shortboard. Surfboard dimensions are 5'8" x 19 1/4" x 2 3/8". Volume is 28 liters. EPS foam blank. Bottom contours are single concave to double concave at the tail. This is a replica of the Channel Islands Sampler model. Epoxy resin used for glassing. Two layers of 4oz fiberglass cloth on the deck and 1 layer on the bottom with a tail patch. FCS 2 fin plugs and leash plug with Ho Stevie honeycomb hexcore fins and the FCS 2 compatibility kit. More videos in this series: Shaping Video:    • Surfboard Shaping [High-Performance S...   FCS 2 Fin Install Video:    • Installing Surfboard Fin Boxes [FCS 2...   Glassing Video:    • Surfboard Glassing [High-Performance ...   Shaping and Glassing from Start to Finish:    • Surfboard Shaping & Glassing [High-Pe...   Website Merch: https://www.bendheimboards.com YouTube:    / bendheimboards   Instagram:   / bendheimboards   TikTok:   / bendheim.boards   Facebook:   / bendheimboards  


I made a 9' Longboard with some flowers inlayed for my sister's b-day. I thought my laminating skills ruined the whole thing but I was relieved to find that it was salvageable. And my sister was stoked on it in the end so it buffed out.


Carbon Fiber Surf board: Shaped a custom board for my friend and took a swing at glassing the board with carbon fiber.

Insta -   / rockandseagarageboardshop  


Here's our man Chris explaining the process of how we make the top and bottom skins for our wooden surfboards... If you would like to join us on one of our surfboard workshop courses, click here - https://ottersurfboards.co.uk/product...


n this video we’ll show you how to use hot glue to glue your frame together. Subscribe, like, and share this video series to join our woodworking community of hollow surfboard & paddle board builders! For more information and links to our Frame Kits or Digital Plans, check our our website jarvisboards.com Follow us for updates and more tutorials: Facebook page: www.facebook.com/JarvisBoards Instagram: www.instagram.com/jarvisboards Chapters: 00:14 Using Hot Glue for Frame Assembly 00:37 Aligning and Securing the Rocker Tabs 01:33 Advantages of Hot Glue 02:12 Connecting the Sections and Adding Side Rails 03:29 Final Touches and Completion For the next or previous videos in this step-by-step 11’8” SUP build series, see the playlist:    • 11’8” Touring SUP Build using the Str...  


his is a 6' 10" paulownia hollow wooden surfboard - an egg design http://wollumbin-woodsticks.blogspot....


🚨 FOLLOW 🚨 🌊 SURF ACTION -   / tandcsurf   🏄🏼‍♂️ SURFBOARDS -   / tcsurfboards   👕 MERCHANDISE -   / tcsurfshop  


🏄‍♂️ I Custom Paint a Hand Made Wooden Surfboard. 🏄‍♂️ Head to http://squarespace.com/tenhundred to save 10% off your first purchase of a website or domain using code TENHUNDRED [Sponsored] The Total Boat MakerPoxy I used on this board - https://www.totalboat.com/tenhun Check out @RedBudRed vid where he makes the board!    • I accidentally made a $10,000 SURFBOARD   Additional Animation by Nino (ig - @ninowerner) Hit him up for animations! - https://www.clrcrs.com/ Check out the Ten Hundred Black Friday Sale - https://tenhundredart.com/ -- MY LINKS: 🔥Merch🔥: https://www.tenhundredart.com/ Patreon:   / tenhun   Instagram:   / tenhun